Create a cluster with Azure Active Directory integration
Need help in this challenge? Check deployment files here :blue_book:!
Here’s what you’ll learn
- Azure Active Directory
- create an AAD application for the API server and kubectl client
- create an AAD group that will have the users allowed to login to the cluster
- Kubernetes
- create a cluster with RBAC and AAD integration
- bind cluster roles to AAD groups
- get admin credentials for the cluster
- login with an AAD user
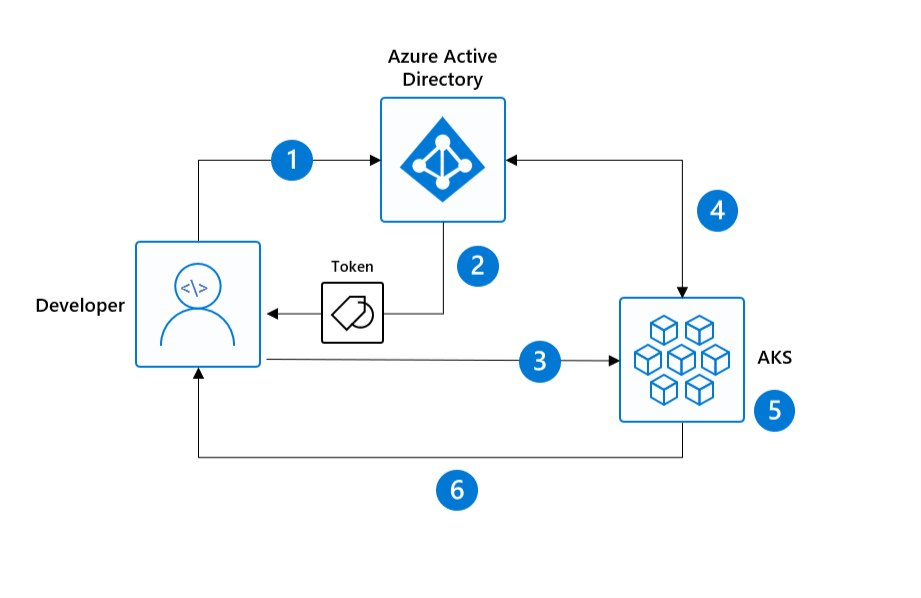 AAD Login Flow
Create AAD applications for the Kubernetes cluster and the client
Optional: If you don’t want to use your organization’s AAD, create a new tenant for testing purposes and afterwards switch to that directory: https://docs.microsoft.com/en-us/azure/active-directory/develop/quickstart-create-new-tenant#create-a-new-azure-ad-tenant
-
Go to your directory and open the Properties blade. Note down the Directory ID. We will refer to that value as TENANT_ID during the deployment of the cluster.
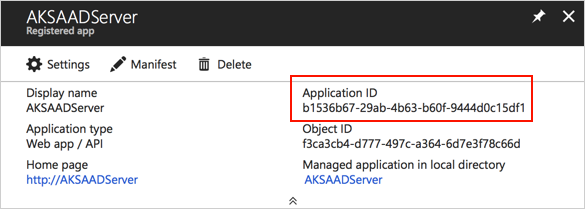
- Create a new server application that represents the Kubernetes API server: https://docs.microsoft.com/en-us/azure/aks/aad-integration#create-server-application
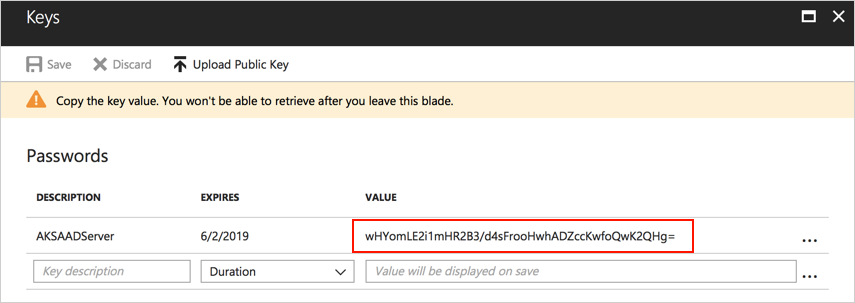
- Note down the application id (referred to as APP_ID later) and application key (referred to as APP_KEY later)
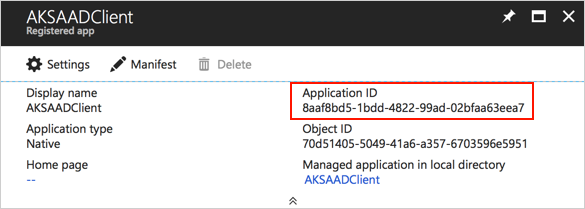
- Create a new client application that represents the Kubernetes CLI (kubectl): https://docs.microsoft.com/en-us/azure/aks/aad-integration#create-client-application
- Note down application id (referred to as CLIENT_ID later)
-
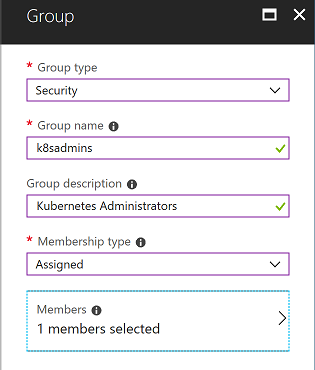
Go to the Groups blade in the Azure Portal (Azure Active Directory), create a new group named k8sadmins and assign your user to it.
-
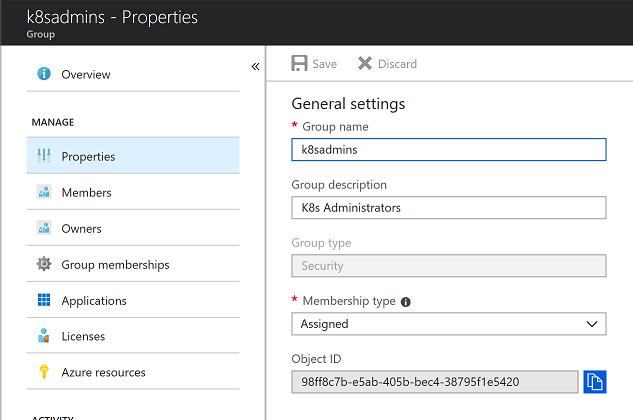
After the group is created, open the properties blade and note down the Object ID (referred to as GROUP_ID later)
Create your AKS cluster with AAD integration
Open a shell and create an AKS cluster via Azure CLI.
> az aks create --resource-group YOUR_RESOURCE_GROUP --name YOUR_CLUSTER_NAME --generate-ssh-keys \
  --aad-server-app-id APP_ID \
  --aad-server-app-secret APP_KEY \
  --aad-client-app-id CLIENT_ID \
  --aad-tenant-id TENANT_ID
This will take a few minutes to complete
After the cluster has been created, download the admin credentials to initially assign cluster roles to the AAD group.
> az aks get-credentials --resource-group YOUR_RESOURCE_GROUP --name YOUR_CLUSTER_NAME --admin
Now assign the cluster role cluster-admin to the AAD group. Therfore, create a file clusterrolebinding.yaml with the following content (replace GROUP_ID with the value of your AAD group id) and deploy it to your AKS cluster:
apiVersion: rbac.authorization.k8s.io/v1
kind: ClusterRoleBinding
metadata:
 name: my-cluster-admins
roleRef:
 apiGroup: rbac.authorization.k8s.io
 kind: ClusterRole
 name: cluster-admin
subjects:
- apiGroup: rbac.authorization.k8s.io
  kind: Group
  name: "GROUP_ID"
> kubectl apply -f clusterrolebinding.yaml
Log in with your AAD User
Now that everything is setup and ready in your AKS cluster, download the context for non-admin users and execute a kubectl command to trigger the device login flow of your Azure Active Directory tenant.
> az aks get-credentials --resource-group YOUR_RESOURCE_GROUP --name YOUR_CLUSTER_NAME
Info: –admin is omitted!
> kubectl get nodes

To sign in, use a web browser to open the page https://microsoft.com/devicelogin and enter the code THZASDERL to authenticate.
After signing in, you should be able to query nodes:
aks-nodepool1-14322398-0   Ready     agent     2h        v1.10.6
aks-nodepool1-14322398-1   Ready     agent     2h        v1.10.6
aks-nodepool1-14322398-2   Ready     agent     2h        v1.10.6
Challenge: Create a ClusterRole/Group to be able to only read pods
First, create a group in the Azure Active Directory connected to your cluster (note down the object-id - you will have to use it in the ClusterRoleBinding!).
Now create a new AAD user and assign the user to the group.
To be able to use the group in the Kubernetes cluster, create a cluster-role named custom:pod-reader and a corresponding cluster-role-binding assigning the AAD group as “subject”.
Remember to use the “admin context”
kind: ClusterRole
apiVersion: rbac.authorization.k8s.io/v1
metadata:
  name: custom:pod-reader
rules:
- apiGroups: [""]
  resources: ["pods"]
  verbs: ["get", "watch", "list"]
apiVersion: rbac.authorization.k8s.io/v1
kind: ClusterRoleBinding
metadata:
 name: my-pod-readers
roleRef:
 apiGroup: rbac.authorization.k8s.io
 kind: ClusterRole
 name: custom:pod-reader
subjects:
- apiGroup: rbac.authorization.k8s.io
  kind: Group
  name: "GROUP_ID"
Now log in with the new user (if it’s not working, delete the context and/or user in ~/.kube/config you used before to access the cluster via RBAC).
- try to read the cluster nodes via
kubectl get nodes - try to read the pods running in the cluster via
kubectl get pods
Housekeeping
If you created an AAD tenant for testing purposes and don’t need it anymore after the workshop, delete the directory via the Azure Portal under Azure Active Directory > Overview (“Delete directory” button). In case you get any errors due to enterprise applications that cannot be delete, here’s help: https://blogs.msdn.microsoft.com/kennethteo/2017/09/19/deleting-azure-ad-tenant/