Advanced Scheduling / Resource Management
Need help in this challenge? Check deployment files here :blue_book:!
Kubernetes has some advanced concepts when it comes to resource handling and scheduling of your workloads. In this challenge, you will learn about how scheduling works in Kubernetes, how you can influence which nodes will be selected and how pods can be prioritized.
Here is what you will learn
- get familiar with the Kubernetes scheduling algorithm
- learn about node and affinity / anti-affinity
- apply resource limits to workloads / namespaces
- stress test your cluster
- get to know pod priority classes and learn how they can help securing important workloads from being evicted when resources are low
Advanced Scheduling
The Kubernetes Scheduler is one of the master components that AKS manages for you. When it comes to a deployment of pods, the scheduler tries to find a node for each pod - one at a time. The algorithm works as follows:
- The scheduler tries to filter out nodes that don’t fit the request. There are several criterias Kubernetes checks. E.g. if a node can provide enough resources (computed as the capacity of the node minus the sum of the resource requests of the containers that are already running on the node), whether labels match or not, if there are disk conflicts (when it comes to mounting volumes), if requested host ports are available or not etc.
- Nodes are then ranked by so-called “priority functions”, e.g.
LeastRequestedPriority(“least-loaded” metric),BalancedResourceAllocation(CPU/memory utilization is balanced after the pod scheduling),CalculateNodeLabelPriority(prefer nodes that have the specified label) etc. Each function gets a weight from 0-10 (whereas 10 means “most preferred”). Nodes with a higher value are then ranked higher. - Finally, the node with the highest priority is picked (if there are multiple nodes with the same rank, one is picked randomly).
Node Affinity
With Node Affinity you can inluence they way Kubernetes picks nodes for scheduling your pod.
Be aware, that there is also the concept of “node selectors” and that the feature discussed here is still in “beta”. Nevertheless, it has some advantages over “node selectors”:
- language is more feature-rich
- rules can be marked as “soft/preference”, rather than being a hard requirement - that means, if a rule can’t be satisfied the pod will still be scheduled
Currently, there are two types of node affinity:
requiredDuringSchedulingIgnoredDuringExecution- being the “hard” requirementpreferredDuringSchedulingIgnoredDuringExecution- being the “soft” requirement
“IgnoredDuringExecution” means that node labels being changed at runtime won’t affect pods currently running on that specific node.
Sample
So first, let’s check the current labels that are attached to the cluster nodes.
$ kubectl get nodes --show-labels
Now add some labels, we can use for scheduling with node affinity.
$ kubectl label nodes <NODE_1> team=blue
$ kubectl label nodes <NODE_2> team=red
$ kubectl label nodes <NODE_3> team=blue
Check, if labels have been applied:
$ kubectl get nodes --show-labels
Now, we are going to deploy a pod with node affinity:
apiVersion: v1
kind: Pod
metadata:
  name: mypod-node-affinity
spec:
  affinity:
    nodeAffinity:
      requiredDuringSchedulingIgnoredDuringExecution:
        nodeSelectorTerms:
          - matchExpressions:
              - key: team
                operator: In
                values:
                  - "blue"
      preferredDuringSchedulingIgnoredDuringExecution:
        - weight: 1
          preference:
            matchExpressions:
              - key: failure-domain.beta.kubernetes.io/zone
                operator: In
                values:
                  - "1"
  containers:
    - name: mypod-node-affinity
      image: k8s.gcr.io/pause:2.0
The rules above say, that the pod will be scheduled on nodes with the label “team=blue” (required rule) and preferably on a node which is in the “failure-domain 1” (prefered rule).
Kubernetes supports the following operators when defining rules:
- In
- NotIn
- Exists
- DoesNotExist
- Gt
- Lt
Anti-Affinity can be achieved by using
NotInandDoesNotExist.
Pod Affinity / Anti-Affinity
Pod Affinity / Pod Anti-Affinity work the same way as Node Affinity, except that scheduling is based on labels on pods that are already running on one node rather than node labels. The rules are of the form:
This pod should (or, in the case of anti-affinity, should not) run on node X if that node X is already running one or more pods that meet rule Y.
Node X is determined by a topologyKey and Y is expressed as a label seletor.
You can add a list of namespaces, the pod selectors will work on. By default, it will query only pods in the current namespace!
Basic sample for anti-affinity
As a sample for anti-affinity, imagine an application that needs a Redis cache in the cluster. We want to guarantee, that the replicas of the Redis cluster won’t be scheduled on the same node.
apiVersion: apps/v1
kind: Deployment
metadata:
  name: redis-cache
spec:
  selector:
    matchLabels:
      app: cache
  replicas: 3
  template:
    metadata:
      labels:
        app: cache
    spec:
      affinity:
        podAntiAffinity:
          requiredDuringSchedulingIgnoredDuringExecution:
          - labelSelector:
              matchExpressions:
              - key: app
                operator: In
                values:
                - cache
            topologyKey: "kubernetes.io/hostname"
      containers:
      - name: redis-server
        image: redis
Query the pods and show the node each pod is running on:
$ kubectl get po -o wide
House-Keeping
Remove the Redis cluster.
$ kubectl delete -f .\pod-anti-affinity.yaml
Pod Priority
Priority indicates the importance of a pod relative to other pods. A pod priority influences the scheduling of a pod and out-of-resource eviction ordering on the node - bottom line: by PriorityClass, you can define how important a pod is for your application - and Kubernetes will respect your settings.
It is best to just see an example when it comes to working with pod priorities.
Sample
First, let’s create two priority classes we can use when scheduling pods - one “high”- and one “low”-priority class.
Note: A PriorityClass is non-namespaced!
apiVersion: scheduling.k8s.io/v1beta1
kind: PriorityClass
metadata:
  name: myhigh-priority
value: 100
globalDefault: false
description: "This is the high-prio class."
---
apiVersion: scheduling.k8s.io/v1beta1
kind: PriorityClass
metadata:
  name: mylow-priority
value: 10
globalDefault: false
description: "This is the low-prio class."
Now, we need to simulate a situation, where pods can’t be scheduled anymore. Therefore, we deploy many pods, that alltogether request a lot of CPU.
Maybe you have to tweak the
replicassetting for your cluster to provoke that situation
apiVersion: extensions/v1beta1
kind: Deployment
metadata:
  name: lowprio-pods
spec:
  replicas: 30
  template:
    metadata:
      labels:
        name: lowprio-pods
    spec:
      containers:
        - name: lowprio-pods
          image: k8s.gcr.io/pause:2.0
          resources:
            requests:
              cpu: "250m"
              memory: "64Mi"
            limits:
              memory: "128Mi"
              cpu: "2000m"
      priorityClassName: mylow-priority
You can see, that some of the pods can’t be scheduled, because Kubernetes reports low resources. You can execute kubectl get events to review the events including detailed information why the pods coudn’t be scheduled.
Now, if we wanted to deploy further pods that definitely need to run, we wouldn’t be able to do so - except: we can give them a higher priority which leads to eviction of running pods with “low-priority”.
You can test the behavior by deploying two pods with the “myhigh-priority”.
apiVersion: extensions/v1beta1
kind: Deployment
metadata:
  name: highprio-pods
spec:
  replicas: 2
  template:
    metadata:
      labels:
        name: highprio-pods
    spec:
      containers:
        - name: highprio-pods
          image: k8s.gcr.io/pause:2.0
          resources:
            requests:
              cpu: "1000m"
              memory: "64Mi"
            limits:
              memory: "128Mi"
              cpu: "2000m"
      priorityClassName: myhigh-priority
If you check both deployments, you will notice, that Kubernetes has killed some of the pods with low priority to be able to schedule pods with the higher priority!
House-Keeping
Delete the deployments and priority classes.
$ kubectl delete -f .\lowprio-pods.yaml
$ kubectl delete -f .\highprio-pods.yaml
$ kubectl delete -f .\priority-classes.yaml
Resource Requests / Limits
When it comes to deploying pods to your cluster, you can give Kubernetes some hints about the amount of resources (CPU / memory) your workload will need. As discussed in the scheduling chapter above, these requests will be taken care of in the scheduling algorithm. So basically, you help the cluster deciding, if pods can still be created or not (or if e.g. the cluster autoscaler has to create new nodes to be able to fulfill your request).
Resource Types
There are two types of resources, you can set requests and limits for:
- CPU
- Memory
Now, let’s try setting resource limits and experiment with them by scheduling some pods that consume a lot of resources.
Set Defaults on Namespace
We set the limits/request on the namespace level. You can also define them when specifying the pod.
CPU Limit
apiVersion: v1
kind: LimitRange
metadata:
  name: cpu-limit-range
spec:
  limits:
  - default:
      cpu: "1"
    defaultRequest:
      cpu: "0.5"
    type: Container
Memory Limit
apiVersion: v1
kind: LimitRange
metadata:
  name: mem-limit-range
spec:
  limits:
  - default:
      memory: 200Mi
    defaultRequest:
      memory: 100Mi
    type: Container
Test the Resource Limits
First, we deploy a pod that wants to consume 2vCPU of our cluster.
apiVersion: v1
kind: Pod
metadata:
  name: cpu-demo
spec:
  containers:
  - name: cpu-demo-ctr
    image: vish/stress
    # You can also define limits and requests on Pod level
    # resources:
    #   limits:
    #     cpu: "1"
    #   requests:
    #     cpu: "0.5"
    args:
    - -cpus
    - "2"
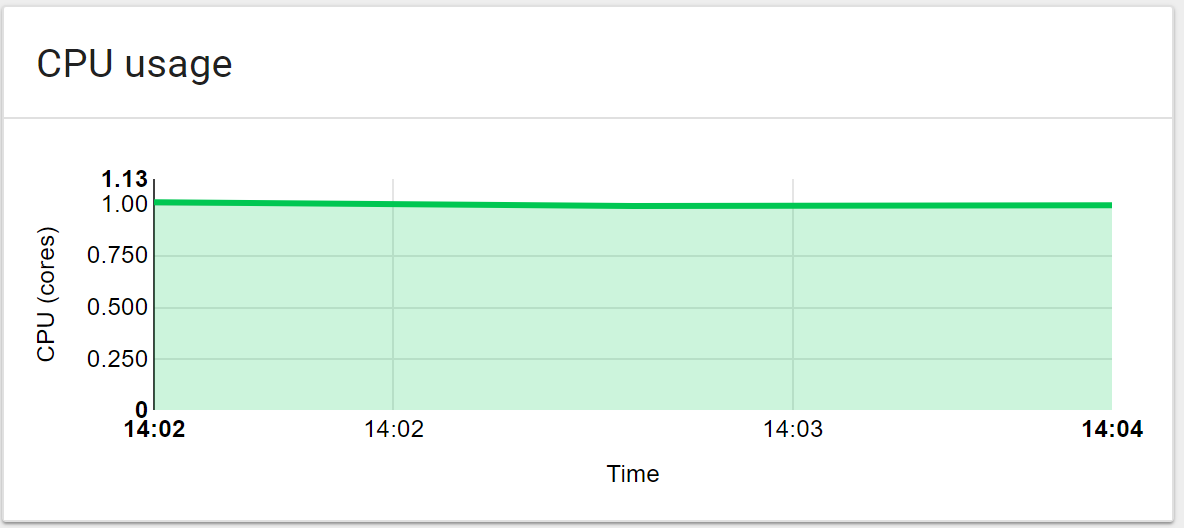
As you can see e.g. in the Kubernetes Dashboard, CPU usage will be limited to the amount we set in the resource limits of the namespace.
Stress Memory
Next, we are going to test, how Kubernetes handles pods that want to consume more memory than they are allowed to.
apiVersion: v1
kind: Pod
metadata:
  name: memory-demo
spec:
  containers:
    - image: vish/stress
      imagePullPolicy: Always
      name: memory-demo-ctr
      args:
        - -cpus
        - "1"
        - -mem-total
        - "600Mi"
        - -mem-alloc-size
        - "10Mi"
        - -mem-alloc-sleep
        - "6s"
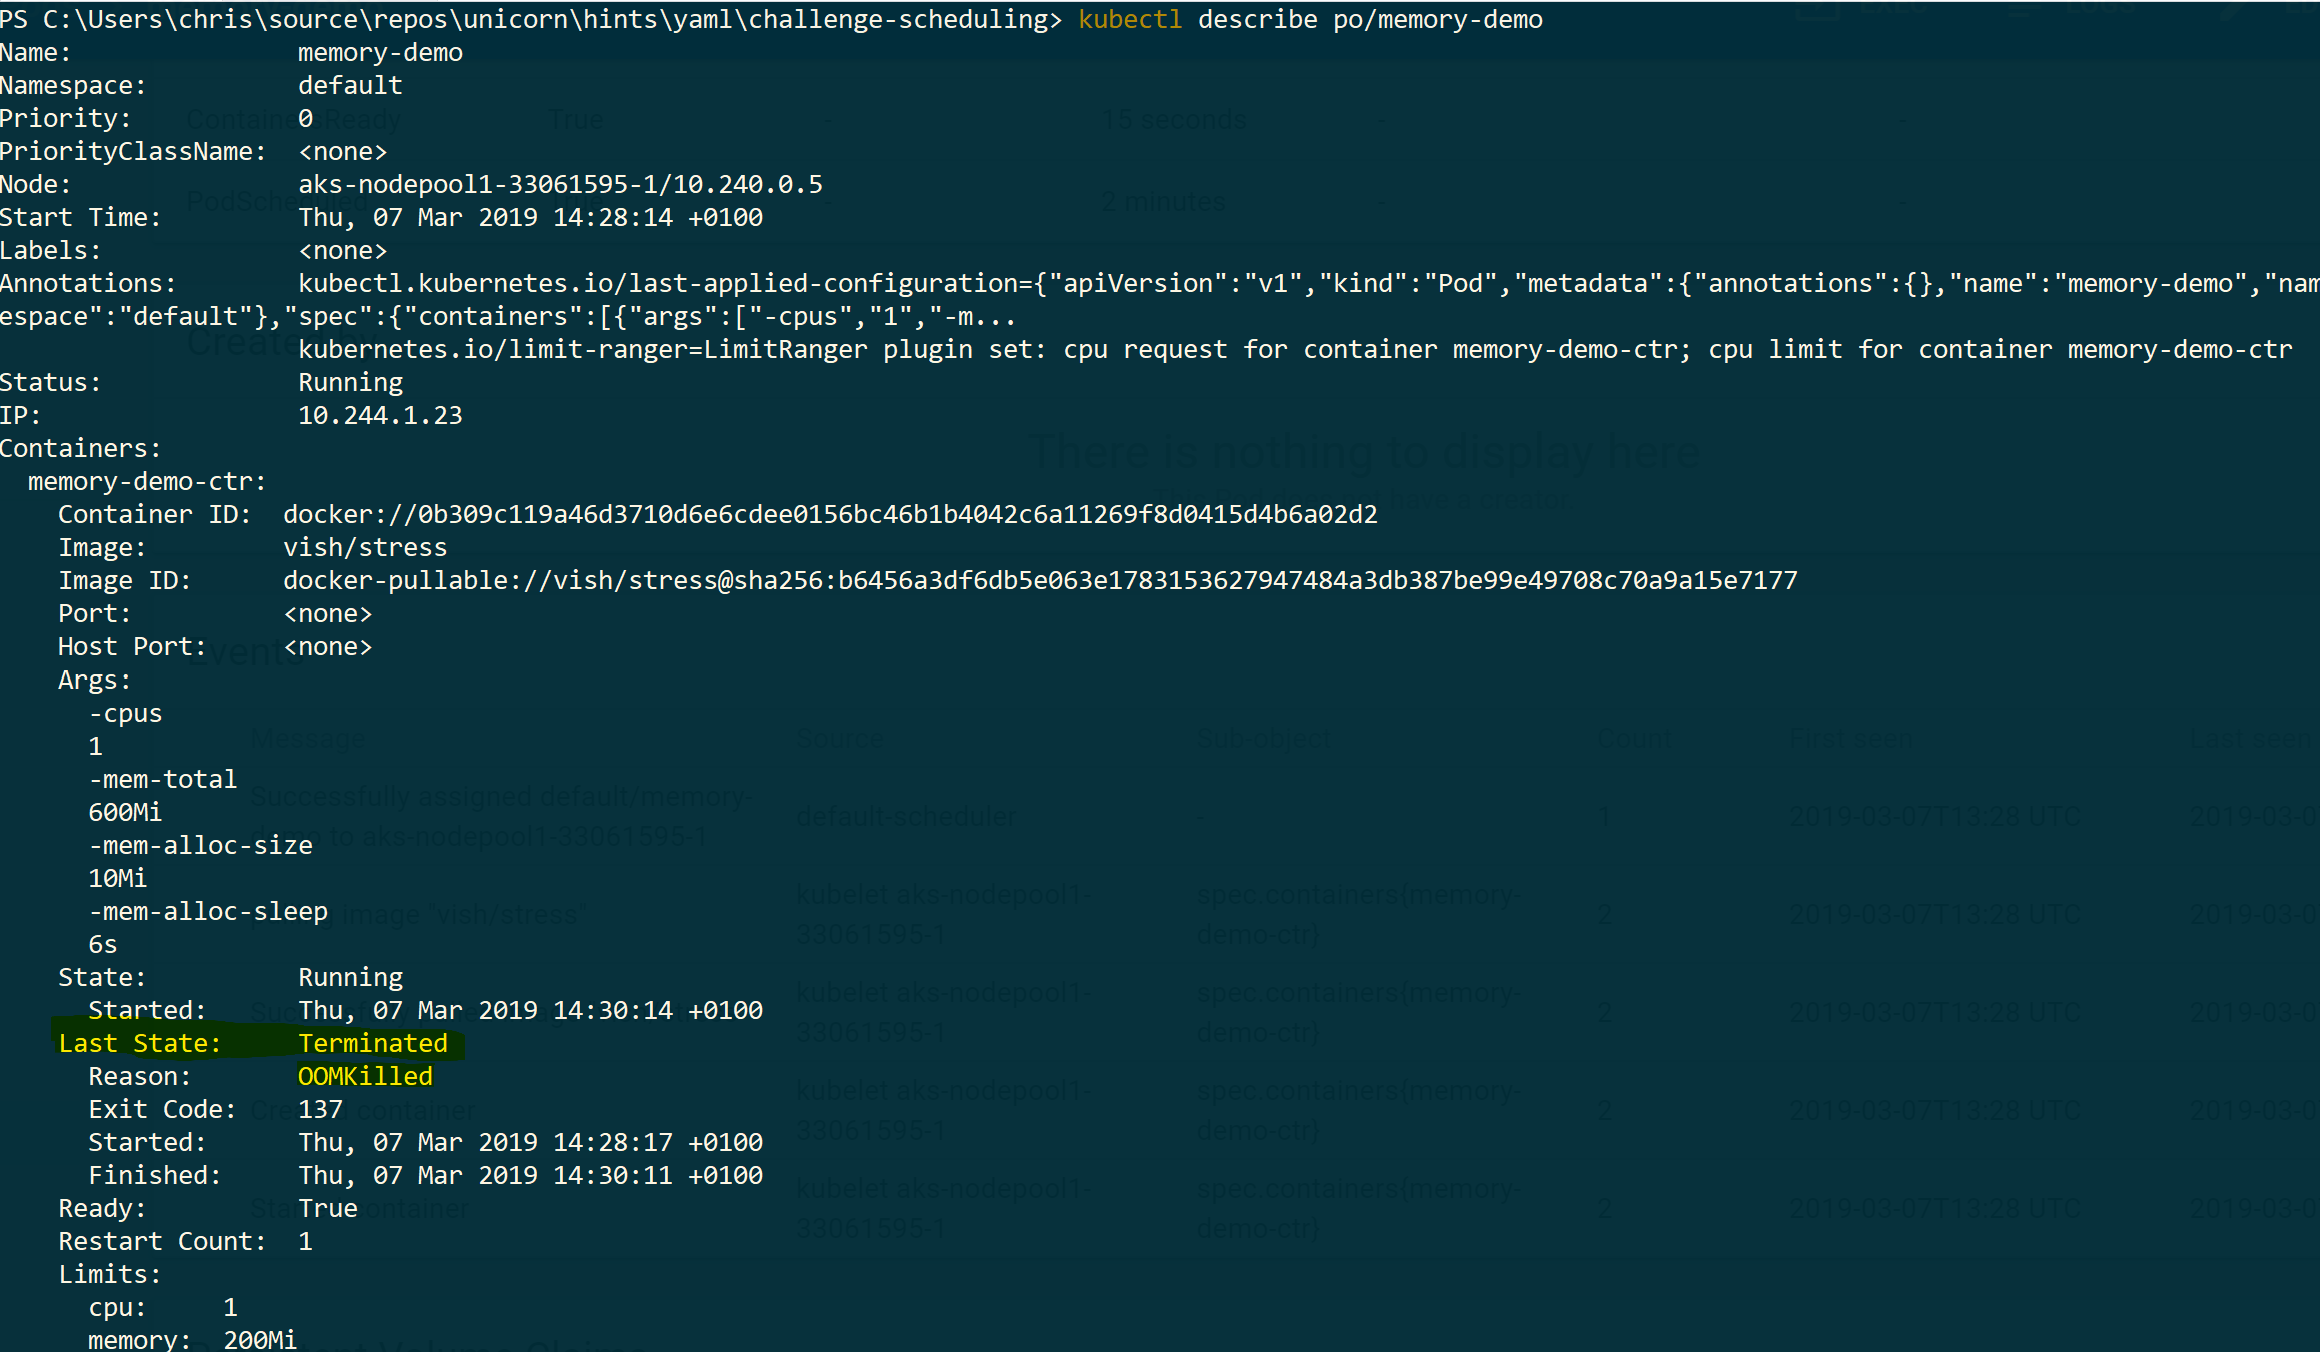
This pod will allocate 10MB of memory (up to 600MB) each 6s. Because we set a limit of 200MB on the namespace, the pod will be killed and restarted after about 2 minutes.
Check the pod status by the following command:
$ kubectl describe po/memory-demo
You can see, that the pods has been automatically killed by Kubernetes and should have similar results as shown here:
House-Keeping
Delete the limits and pods.
$ kubectl delete -f ns-cpu-limit.yaml
$ kubectl delete -f ns-mem-limit.yaml
$ kubectl delete -f stress-cpu.yaml
$ kubectl delete -f stress-mem.yaml
Horizontal Scaling
Every organisation running a Kubernetes cluster in production comes to the point where they have to think about auto-scaling workloads/services in their application. Fortunately, with the Horizontal Pod Autoscaler Kubernetes allows you to configure your deployments to scale horizontally. Kubernetes will track the load of existing pods and determine, if further pods have to be scheduled or not.
We won’t go into deep with HPA, but show you an exmaple of how you can achieve horizontal scaling.
First, deploy an nginx deployment with a service and an autoscaler:
# nginx.yaml
apiVersion: apps/v1
kind: Deployment
metadata:
  labels:
    app: nginx-worker
  name: nginx-worker
spec:
  replicas: 1
  selector:
    matchLabels:
      app: nginx-worker
  template:
    metadata:
      labels:
        app: nginx-worker
    spec:
      containers:
        - image: nginx
          name: nginx
          ports:
            - containerPort: 80
          resources:
            requests:
              cpu: 200m
              memory: 64Mi
            limits:
              cpu: 200m
              memory: 128Mi
---
apiVersion: v1
kind: Service
metadata:
  labels:
    app: nginx-worker
  name: nginx-worker
spec:
  ports:
    - name: 80-80
      port: 80
      protocol: TCP
      targetPort: 80
  selector:
    app: nginx-worker
  type: ClusterIP
---
apiVersion: autoscaling/v1
kind: HorizontalPodAutoscaler
metadata:
  name: nginx-worker
spec:
  maxReplicas: 10
  minReplicas: 1
  scaleTargetRef:
    apiVersion: apps/v1
    kind: Deployment
    name: nginx-worker
  targetCPUUtilizationPercentage: 1
status:
  currentReplicas: 0
  desiredReplicas: 0
$ kubectl apply -f nginx.yaml
Now, put some load on the service.
$ kubectl run -i --tty load-generator --image=busybox /bin/sh --rm=true

$ while true; do wget -q -O- http://nginx-worker.default.svc.cluster.local; done
See how the HPA works.
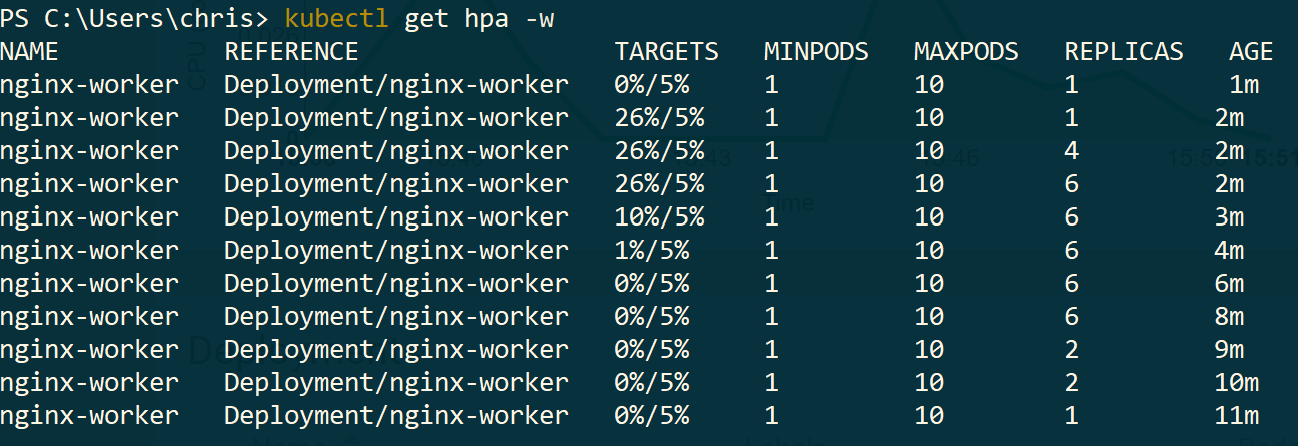
$ kubectl get hpa -w
You should see similar results (notice the REPLICAS column):
Further information on how the algorithm works in detail can be found here:
https://kubernetes.io/docs/tasks/run-application/horizontal-pod-autoscale/
House-Keeping
Delete the deployments.